
kikimiqbalsoft - This page covers the most basic scraping technique. It’s still a great method to learn, and produces pretty good results...
kikimiqbalsoft - This page covers the most basic scraping technique. It’s still a great method to learn, and produces pretty good results. If you want to learn more advanced scraping methods though, feel free to check out my advanced scraping guide. You’ll learn step by step techniques here that aren’t taught anywhere else.
Scraping TOC
0.0 Overview
0.1 Adjust Maximum Connections
—–0.2 Adjust Timeout Settings
—–0.3 Custom Footprint
—–0.4 Search Engines And Proxies
—–0.5 Combining Keywords And Footprints
—–0.6 Start Harvesting
0.1 Adjust Maximum Connections
—–0.2 Adjust Timeout Settings
—–0.3 Custom Footprint
—–0.4 Search Engines And Proxies
—–0.5 Combining Keywords And Footprints
—–0.6 Start Harvesting
1.0 Gscraper Overview
—–1.1 Proxy Tab
—–1.2 Options Tab
—–1.3 Scrape Tab
—–1.4 Running The Scrape
—–1.1 Proxy Tab
—–1.2 Options Tab
—–1.3 Scrape Tab
—–1.4 Running The Scrape
2.0 Hrefer Overview
—–2.1 Hrefer Options
—–2.2 Proxies
—–2.3 Other Settings
—–2.1 Hrefer Options
—–2.2 Proxies
—–2.3 Other Settings
3.0 Importing Your Urls To SER
Overview
In this series of video tutorials I am going to cover how to do keyword plus footprint scraping using the three most popular scraping tools. The tools I’m going to be covering are Scrapebox, Gscraper and Hrefer. I will be going over how to configure the different settings for each tool, as well as how to scrape hundreds of thousands and millions of URLs with each of them as well. The first tool that we are going to be covering is Scrapebox.
SB Video Tutorial
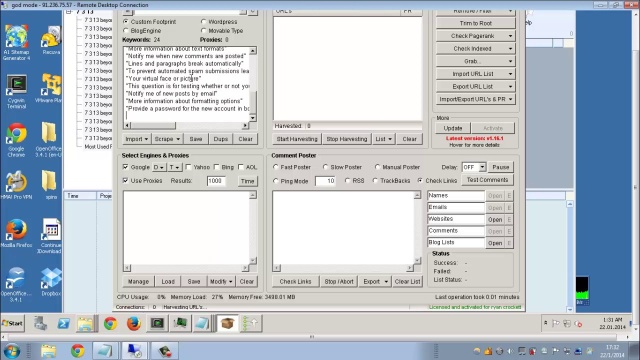
Adjust Maximum Connections
Before you can start your scrape, there are several options and settings that you need to configure. The first option that you need to configure, which is very important, is under the settings menu and it’s called adjust maximum connections. Adjust maximum connections allows you to tell Scrapebox how many threads you want to use for each search engine.

It’s up to you how many search engines you want to use, but personally, I only use Google. As far as proxies go, I like to use public proxies for scraping. If you are using public proxies, and you are on a dedicated server, you won’t have any trouble using 500 threads for Google. If you are using other search engines in addition to Google, it would be a good idea to split 500 or 600 threads among all of the search engines that you use.
So if you have Google and Yahoo selected, use 250 or so threads for each search engine as a starting point. If you don’t want to use public proxies for whatever reason, you can probably get away with about 10 threads per proxy when using private, or shared private proxies. It’s possible to use private proxies successfully and avoid temporary IP bans from Google as long as you don’t use queries that contain too many special operators.

If you’re using queries that are a bit more vague and don’t contain things like inURL, then you can probably get away with scraping for quite a long time with a small amount of private proxies. Using public proxies is the best idea though, because usually when you use a public proxy service that provides you with freshly scanned public proxies, you will get access to several thousand working public proxies at any one time.
This allows you to scrape without worrying about getting banned by Google. As always though, you are going to need to experiment with your particular set up in order to get the best results. So just play with the maximum connections and see what works best for you.
Adjust Timeout Settings
The next setting that we are going to configure is also in the settings menu. This one is called adjust timeout settings. For scraping, the slider that you are going to want to pay attention to is called harvester timeout. I think Scrapebox defaults to setting this at 30 seconds, which is a pretty good timeout.

What this timeout option does, is it controls how long each thread is allowed to try and pull back results. So if you have it set to 30 seconds, and no results are pulled back within this 30 seconds, then the query is going to timeout. The higher you set this value, the more successful queries you are going to have. The lower you set it, the more keyword and footprint combinations you are going to go through.
Stick with 30 seconds, and if you feel like you are seeing too many failed queries when you’re finishing your scrapes, you can experiment with a higher timeout if you want to. Just like with many things in SEO, you will have to play with it to find out what works best for your particular situation.
Custom Footprint
Because you are going to be extracting footprints that GSA Search Engine Ranker uses, you are going to want to be sure that you select the custom footprint option in Scrapebox. If you accidentally have one of the other footprint types selected, you are going to end up with a keyword followed by two footprints. This is obviously not going to pull back the results that you want.
Search Engines And Proxies
Now we are going to talk about the search engine and proxy options. I only scrape targets using Google so I would only have Google checked, but if you want to use other search engines you can go ahead and check the other ones that you want to use as well.
Another thing that you want to check, is to make sure that the T button is set to default. If you accidentally have it set to a different part of Google, like Google videos, the results are not going to be good. Also make sure that you have used proxies checked, and that you have your proxies pasted into the window below the use proxies option.

Clicking the manage button allows you to test your proxies if you want to do that. When it comes to the amount of results that you want to scrape, you have a few different options. If you have it set to 1000, this is perfectly okay, but it’s going to take longer to process all of your keyword footprint combinations.
You are also more likely to pull back irrelevant results when returning 1000 URLs. You can also set this number to 100. This would allow you to try more keyword footprint combinations more quickly, but technically you might miss out on some results as well. You’ll have to make this choice for yourself.
Next you will want to check the time button. Make sure that for every search engine that you are going to be scraping, that you have the time option set to any time. If you accidentally selected the past 24 hours for example instead of any time, you are going to end up with practically no results. Unless you know what you’re doing, and you have a good reason to change this option, just stick with any time.
Combining Keywords And Footprints
Now we have all of our Scrapebox settings correctly configured. The final step before we can begin scraping is to import our footprints, and then combine them with our keyword list. Collecting GSA Search Engine Ranker’s footprints is extremely easy. You simply open up the program, click options in the toolbar, go to advanced, then click tools and search online for URLs.

Once the search settings box pops up, just click the button add predefined footprints. You’ll see a menu that lists all of the different platform types that SER can post to. From here you can select the footprints from a single engine like Drupal for instance, or you could select all of the footprints from every article platform that SER has.
If you wanted to choose Drupal, you would just scroll up to the article menu item and choose Drupal. If you wanted all of the footprints from every article platform, just click add all from article. The same is true for all the other platform types too. In the search settings box, you’ll see that the footprints box is now filled with all of the footprints that you selected.

All you need to do at this point is to select all of the footprints and copy them, then paste them into the keywords window in Scrapebox. A list of footprints on its own is not enough. You now need to take a list of keywords and combine each keyword with every footprint. In the video, I only use three keywords, but if I was doing a real scrape I would use hundreds of thousands.

Before you combine your keywords with your footprints, you need to append the %KW% macro to each keyword. There are many ways to do this, but a quick and easy way is to go to textmechanic.com and use their add prefix/suffix tool. All you do is paste your keywords into the top box of that page, put the %KW% macro into the suffix box, and then click the button that combines both of them together.
Now you simply take your keywords combined with the macro, and put them into a text file and save them. Make sure that your footprints are in the keywords box, then click the merge button right above the custom footprint option. This opens up a dialog box that allows you to select a file that contains your keywords.

M stands for merge!
Choose that file that has your keywords with the keyword macro appended on the end. What this does is it combines every keyword in your keyword list with every footprint inside of the keywords box. One last point I want to make, ideally, before you run your scrape you will want to randomize your keyword footprint combinations.
Text mechanic also has another tool called sort text lines. All you do is paste your keyword footprint combinations into the window and then click random. At that point you just need to copy and paste your newly randomized strings back into the Scrapebox keywords box.
The reason that randomizing your search strings is important, is that it gives you a better chance to evade Google’s temporary ban filters. If you are using inURL queries for example, it would be better that you search on Google with one of those queries one out of 50 times, instead of 50 in a row.
Start Harvesting
With all of our settings configured, and our keywords combined and ready to go, we can begin scraping. All you need to do to put Scrapebox in motion is to click start harvesting. Since you are likely to be doing a scrape that’s going to collect hundreds of thousands or millions of results, you just need to wait until Scrapebox finishes.

This can take a few hours, or a few days depending on how many keyword footprint combinations you used. Just be patient and let Scrapebox do its job. After your scrape completes, the harvester keyword statistics window will appear. If you want to rerun all of the queries that failed on your first scrape, just click export keywords and then choose export all not completed keywords to keywords list.
This will put all of the keywords that failed back into your keywords box while at the same time removing all of the successful keywords. This is a very convenient way to rerun all of your unsuccessful queries. Now we will talk about the two possibilities that are likely to occur in my experience with Scrapebox.

If you scraped less than 1 million results, you aren’t going to have any trouble. You can simply go to the export URL list button and choose how you want to export your list. If on the other hand, you scraped 10 million results, Scrapebox is likely to crash at this point. You don’t need to worry though.
To find all of the results that you scraped, just go into your Scrapebox folder, and then go into the harvester sessions folder. It’s here that you will find all of the URLs that your scrape returned. After I have explained how to use this scraping technique with all three pieces of software, I will go over how to import your URLs for use with GSA SER.
Gscraper Overview
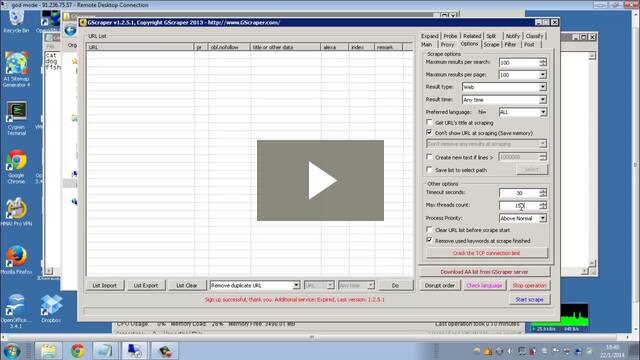
Now we are going to take a look at how to do keyword and footprint scraping using Gscraper. Just like with Scrapebox, we need to configure some options and settings before we can begin our scrape. In Gscraper, the three tabs that you need to configure are the proxy tab, the options tab and the scrape tab. Now we’ll look at the different settings that you need to pay attention to in each of these tabs.
Proxy Tab
The first tab we are going to look at is the proxy tab. For scraping the search engines, you are definitely going to want to use proxies, so make sure that the use proxy checkbox is checked. Next, in the proxy option drop-down box, you have two options. They are ignore and skip, and change and retry.

They don’t really need much explanation because the Gscraper descriptions are pretty good. But to briefly cover them, if you choose to ignore and skip when a proxy fails or a query times out, it’s simply going to go to the next query. If you choose change and retry, and the same problems occur it is going to try a new proxy and retry that same query.
If you are going to be using a ton of keyword plus footprint combinations, and you don’t care if a few queries get lost in the mix, then go ahead and choose to ignore and skip. If it’s important that you run an accurate scrape, then choose change and retry. When it comes to scraping, most of the time the better choice is to do the fastest option, and make sure that you’re doing it in bulk.
So have hundreds of thousands or millions of keywords, and simply use ignore and skip. When it comes to proxies, you have two main choices with Gscraper. You can choose to use the Gscraper proxy service, or you can use public proxies. Every Gscraper user gets a free trial of their proxy service, so of course I put it through its paces. From my experience, it does not perform a lot better than normal public proxies.

Paste your proxies into the big box, or use the import button.
So I would recommend that you use a paid public proxy service. These only cost $10-$20 compared to the $60 or so that Gscraper wants for their proxies. If you are using your own proxies, all you need to do is put them in the box at the bottom of this options panel. If you are using pre-scanned public proxies, personally I don’t bother testing them. I just use them as is, and I always get good results. So go ahead and try it my way.
Options Tab
With our proxies all set up, next let’s look at the options tab. Maximum results per search is a little bit of a personal choice. If you choose 500 through 1000 results, you are going to end up getting more junk in your list. Although you will be scraping very comprehensively. At first it might be better to try pulling back 100 results and using a lot of keywords and footprints.

Very long tail keyword plus footprint combinations don’t pull back relevant results for too many pages, so the first 100 will probably give you a pretty good list of results for that particular keyword. For maximum results per page, you are going to want to choose 100. Only being able to scrape 10 URLs per page is going to result in a lot of extra queries which is never a good thing when you are trying to avoid Google temporary bans.
For result type choose web, for result time choose any time. There are some circumstances where you would want to choose different options here, like if you’re trying to post to new blog entries, but we aren’t trying to do that with SER. The checkbox don’t show URLs at scraping is quite important. If you don’t have it checked, you have the option to filter duplicate URLs or domains as Gscraper collects results.
If you want to filter duplicates on-the-fly, then choose the option you like to use and do not check the don’t show URL at scraping checkbox. If you want to remove duplicate domains or URLs later, this is also a perfectly valid choice, and Gscraper makes this extremely easy to do. So both ways are okay. While Gscraper does save all of your URLs to a text file that it automatically creates, if you want to choose a specific name for your text file just check the box save text to selected path, click the select button and choose a name for your scraped URLs.

Use these options to remove dups as you scrape.
Timeout is probably already okay at 30 seconds, and maximum threads can be safely set at 200 through 500 on a dedicated server. You can most likely also use similar values on a VPS. I also need to mention that if you are on a dedicated server, you can scrape with 200 through 500 threads, and also post using something like GSA SER at the same time. This ensures that you are able to have your server working 24 hours per day.
The last option in this panel that is important is remove used keywords when scrape finishes. If you stop or pause the scrape for any reason, this option will make sure that all of the keywords that you have already scraped with are removed from your list. This ensures that when you restart the scrape you will only be using keywords that you have not yet used.
Scrape Tab
The final tab that we need to configure before we can begin scraping is the scrape tab. This is the options panel where you are able to input your keywords and footprints. Unlike the other scraping tools that we are talking about in this series, Gscraper comes with its own list of built-in keywords.

These keywords are already pretty good, and are a good starting point for any scrape. If you would like to import your own keywords though, in the drop-down box that says do not format keywords, you can choose to add a ~, or double quotes to your keywords if you want to. In my experience the ~ character does have a positive impact on the amount of results you’re able to collect.
After you choose how you want to format your keywords, just click the import button and select the text file that contains your keywords. Also, you should check the box disrupt order, as this will randomize the order of your keywords when you import them. Adding footprints from GSA SER is exactly the same process as the one I described above when using Scrapebox.
So just follow those steps, then save the footprints into a text file, then under the footprints options in the scrape tab, just click import and then choose that file with your footprints. With our keywords and footprints loaded, and all of our settings properly configured, we are now ready to begin scraping.
Running The Scrape
To begin scraping simply click the start scrape button. Now, all you need to do is wait while Gscraper goes out and collects those URLs for you. Setting up Gscraper is a little bit easier than Scrapebox. It has a separate box for both keywords and footprints, which saves you the trouble of merging those two things together.
Hrefer Overview
Now we come to Hrefer. This is the scraping program that I actually use to build all of my lists. There is nothing wrong with the other two scraping tools, I’ve just been using this tool for longer than either of them, so I’m extremely comfortable with this program. One big advantage, that only Hrefer had up until very recently is the ability to remove duplicates on-the-fly.

The original professional scraper.
Now that Gscraper is here, Hrefer is not the only program that can do this, but Gscraper is only a year or so old, and Hrefer has been around since 2005 or 2006 at least. Personally I began using Hrefer in 2006. Scrapebox probably came out within a few years of 2006, but it wasn’t until much later that the tool in SB that allows you to remove duplicate domains from very large files was added.
So it was extremely limited and unless you have another tool that removes duplicate domains. Hrefer was way ahead of its time, and other scraping tools have only recently caught up. Another great thing about Hrefer is the fact that there’s no URL limits. You can scrape over 10 million URLs or domains with no problems. This is all in a single go without Hrefer crashing or freezing or any of that nonsense. Another advantage of Hrefer is that it is very fast.
If you use the right proxies with the program, you’ll have no trouble scraping upwards of 10 million URLs per day, or even more depending on what type of scraping you are doing. Another great part of Hrefer is its flexibility. For instance, in Gscraper it’s very awkward to scrape using only keywords, but in Hrefer you simply check one box and you can hammer the search engines with only keywords if you want to.
Uncheck that box and you are back to using keywords and footprints. Hrefer also has the ability to allow you to only scrape URLs that contain certain strings. And it could do all of this back in 2006! That’s enough about all the things that Hrefer can do, let’s get into some scraping.
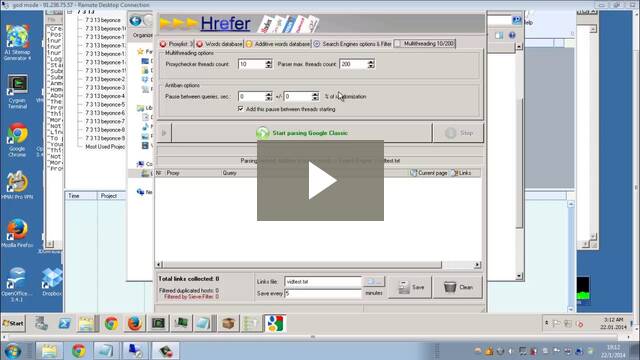
Hrefer Options
The first part of the software that we are going to configure is in the options menu. Just click options and then go to parsing options. The most important options in this box are the duplicate filtering options, and the additive word options. For duplicate filtering, if you check enable filtering of duplicate links by hostname, you will be able to filter duplicates on-the-fly by either hostname or by URL.

You can choose if it filters by domain or URL under the duplicates filtering method option section. Simply check the option that you want to use. In the query options box, you can choose whether or not to use footprints, or as Hrefer calls them, additive words. If you want to use them don’t check that box, if you don’t want to use them just check the box. Most of the other options either don’t need to be checked, or are not that important. Once you have the options selected that you want to use just click save and close.

Options I commonly use.
Proxies
The next thing we are going to look at is the amount of threads that you use to scrape Google with. I use two hundred threads, mainly because I use proxy rack for my proxy service, and their packages are based on the amount of threads that you want to purchase.
If you are using normal public proxies, you could use 500 threads pretty safely. That’s the amount that I always used in the past when using pre-scraped public proxies. For the option pause between queries, just set each box to 0 seconds, I don’t think you can uncheck the box.

If you are going to let Hrefer collect proxies on its own, the proxy checker threads count is the amount of threads that Hrefer is going to use when it is collecting and testing proxies. You can safely use a few hundred threads here at least.
Other Settings
Once your threadcount is set, the next thing you will want to do is choose which search engines you are going to scrape. Personally I only scrape Google, of course you can use as many search engines as you see fit. To choose your search engines, in the search engines options panel, just click the drop-down box under SE.

You’ll be presented with a variety of different search engines that you can use to collect target URLs. My results using Google are already very good, so I don’t think it’s necessary to use the other search engines. Now we will set up our footprints. In Hrefer, footprints are called additive words. So simply go to GSA Search Engine Ranker, and extract the footprints you want to use like I’ve already shown you here, then click edit additive words and paste in your footprints.

Once you paste your footprints into the edit additive words box, just make sure that you click save when you’re done. The last thing you need to do is set up your keywords. In Hrefer, keywords are just called words. And you select which words file you want to use by clicking on the words database tab.
Before you can use your keyword file, you need to copy and paste it into your Hrefer folder in the words subfolder. Once you do that, just restart Hrefer, go to the words database tab, and in the drop-down box in that options panel just find the keyword list that you pasted into that folder and click it.
One last thing, to manually insert proxies into the software, just go to your Hrefer folder, and open up the Xproxy.txt file. Paste your proxies into this file and save it. Now just restart Hrefer and you are ready to scrape. Just click start parsing and wait.
Importing Your Urls To SER
There are two primary ways that you can import your URLs into GSA Search Engine Ranker. The first way is to right-click on your project and then select import target URLs, and then from file. From here you just select the text file that you created with your scraping program that contains your raw URL list.

At this point you would just click start and SER is going to attempt to post to the URLs you imported. The next way to import URLs is to go to options in the toolbar, click advanced, then tools, and choose import URLs identify and sort in. This is going to bring up a dialog box that lets you choose a file. Of course you are going to want to choose the file with the URLs that you scraped.
SER is then going to visit each URL and try to determine if that URL belongs to an engine type that it recognizes. If it does recognize it, it saves this URL in your identified global sites list. Now which option should you use to import your URLs? If you just want to make as many links as possible, and you don’t care about doing any filtering, then right clicking and directly importing them into your project is the best and easiest way.

Second way to import urls.
If however, you would like to strictly and accurately filter them, importing and identifying them first is the best way. This is because you can then take those identified files, and run any variety of filters against them before you attempt to post to them. A third way that you could do things is to use the first method of directly importing them into your projects, but use a fake URL to post to, and then once the posting is finished, you simply run whatever filters you want to on your verified URLs.
At that point you would have a list of URLs that have a PR that’s acceptable for your project, perhaps PA and DA also checked, among other things, and then you can use those filtered and verified URLs in any projects that you want to.--
Next, would you like to read more about: AUTO CAR or more about the MOTORCYCLES? , Like this kind of AUTOMOTIVE content? Subscribe via Email, Facebook or Follow us "on twitter" @kikimiqbalsoft , to get our updates everyday!


COMMENTS